In my recent article about creating a webpack loader to generate WebAssembly with Go I decided I wanted to be able to easily release the loader to npm as I was building it.
To do this I decided that I was going to use Azure DevOps as it gives me a nice separation between the build phase and the release phase. Also, a lot of people are unaware that Azure DevOps pipelines are free for open source projects, so again there’s a nice little bonus that we can leverage for our project.
Creating a build
The first step you need to do is create a build definition. We’ll do that by installing the Azure Pipelines GitHub application (if you haven’t already installed it) and activate it for our GitHub repository.
When linking them we’ll authorise Azure DevOps to have access to our GitHub information and create a pipeline using the Node.js template definition as the base, but we’re going to customise it a bit before saving it.
The Node.js template looks like this:
| |
It’s stating that this build is triggered on the master branch, so PR’s won’t trigger this one (we could always trigger a different build for PR’s). Next it’s telling us that the build agents will be in the pool of Linux hosted agents, in particular Ubuntu 16.04 is the distro that will be used.
Now we’re into the tasks the agent will run, first up is a task to install Node.js at the version you request. It’ll default to the latest LTS, but you can tweak that if you want to do version pinning or anything, just change the versionSpec property. Lastly we run a script task which will just execute a script in the shell of the agent (in this case, a Linux script, but it’s a Windows script if it was a Windows agent) that runs npm install and npm run build. It’s made an assumption that you’ve got a npm script called build that will do the build, so you can tweak that if you want. In fact you can do whatever changes you need, but this is simple for most scenarios. Also, depending on your preference for task roles you could split the install and build steps into separate tasks, that can make it easier to debug a failure if one is hit, rather than having to read the logs.
If you choose Save and Run it will offer to create an azure-pipelines.yaml file in your GitHub repository, either directly in master or in a branch to PR in, so pick your preferred approach, then our build will kick off and should complete successfully.
So how do we release something?
Getting artifacts for release
Our build will run on an agent, generate the stuff we wanted generate (in my case, converted TypeScript to JavaScript) but that only lived on that agent and when the agent is done it’s destroyed. Well that’s not very useful now is it, we want stuff off there to push to npm.
To do that we’ll edit our azure-pipelines.yaml file. First let’s generate a npm package that we can publish:
| |
Again we’re using the script task to do this and we run the npm pack command which generates us a tgz file that can be sent to the npm package repository (or any other that you so desire). But why are we generating a package and not publishing? Well the reason is that we want to split the build phase of our pipeline from the release phase, so Continuous Integration then Continuous Delivery. Doing a release from our build step kind of muddies the waters on what’s responsible for what. Also, by generating the tgz file in the build we’re saying that this is what’ll be released and it can’t be changed, so if we had a staging npm repository we could push it to there, like we can do staging sites for applications. Ultimately, it makes the released artifact more immutable.
We’ve now generated a tgz file, next we need to attach it as an artifact to the build. An artifact is the output of a build that can be picked up elsewhere, either by a chained build, by a release, or just manually looking at the build results.
| |
Using the Copy Files task we can get the files (our tgz and our package.json) and copy them across to the artifacts staging location defined by the variable $(Build.ArtifactStagingDirectory). This is a special directory that the agent has that’s intended to by published as artifacts. Once these files are in the right place we use the Publish Artifacts task to tell our build the files in the folder will be in a named artifact of npm. This name is important as we’ll use it in the future to access them, so make it something logical. I’ll also avoid using spaces in the name of the artifact so that you don’t have to do escaping when you try and use them.
I’ll also copy across the release notes as well as the JavaScript files we generate from the TypeScript compiler as these can be useful for debugging.
When it’s all said and done our build definition now looks like this and you can see its run history here.
Creating a release
Our build is passing, we’re getting artifacts output, it’s time we publish to npm.
Right now the only way to create a release pipeline is using the designer in Azure Pipeline, there’s no YAML export, but it’s a good thing that we have a simple release pipeline then!
Within the Azure DevOps portal we’ll create a new release, use the Empty Job template and name our release stage (I’ve called it Publish).
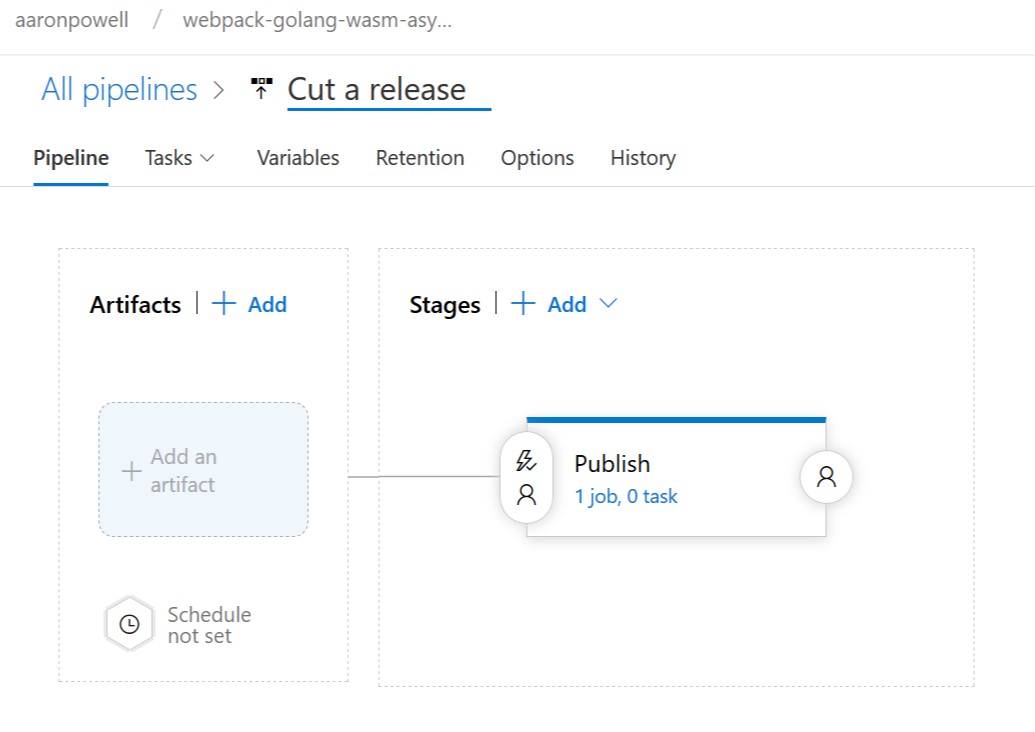
Now we need to define what the stages that our release will go through. A stage can represent an environment, so if you are releasing to UAT then Pre Prod and finally Production you’d have them all mapped out in the build. You can also define gates on each stage, whether there are approvers of a stage release, etc. but all of that is beyond what we need here, we’ve only got one stage, that’s releasing to npm. Check out the docs for more info on Stages.
Conveniently there’s a npm task provided by Azure DevOps that has some common commands defined, including the one we want, publish! Specify the path to our linked artifact named npm (which we named above) and choose to publish to an External npm registry (we use that because Azure DevOps can act as a npm registry).
If you haven’t done so previously you’ll need to create a service connection to the npm registry, use the New button for that and enter https://registry.npmjs.org as the source and a token that you can generate from the npm website under your profile.
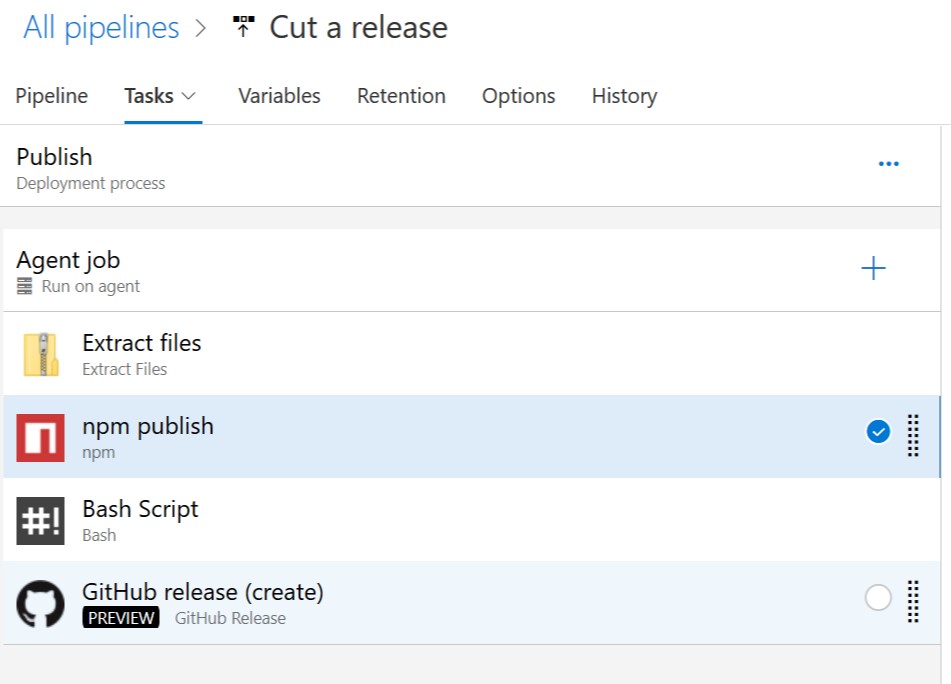
Now you’d think we’d be ready to roll right? Well… yes you do publish to npm but what you publish is a package that contains your tgz, not your tgz. You see, the publish command is capable of taking a tgz and publishing that to npm but there’s a bug in the Azure DevOps task that means it doesn’t work. So unfortunately we’ll need a workaround 😦.
Thankfully the workaround is pretty simple, we need to unpack the tgz file and use the publish task against its contents. We do that with the Extract Files task, specifing *.tgz as what we’ll extract (since we don’t know the filename) and give if a new folder. I used $(System.DefaultWorkingDirectory)/npm-publish. Now we can update our publish command to not use the artifact directory, but the unpacked directory, which in my case is $(System.DefaultWorkingDirectory)/npm-publish/package.
With our stage complete it’s time to link it to the build definition. We do that by adding an artifact, selecting the build pipeline we created and leaving the defaults.
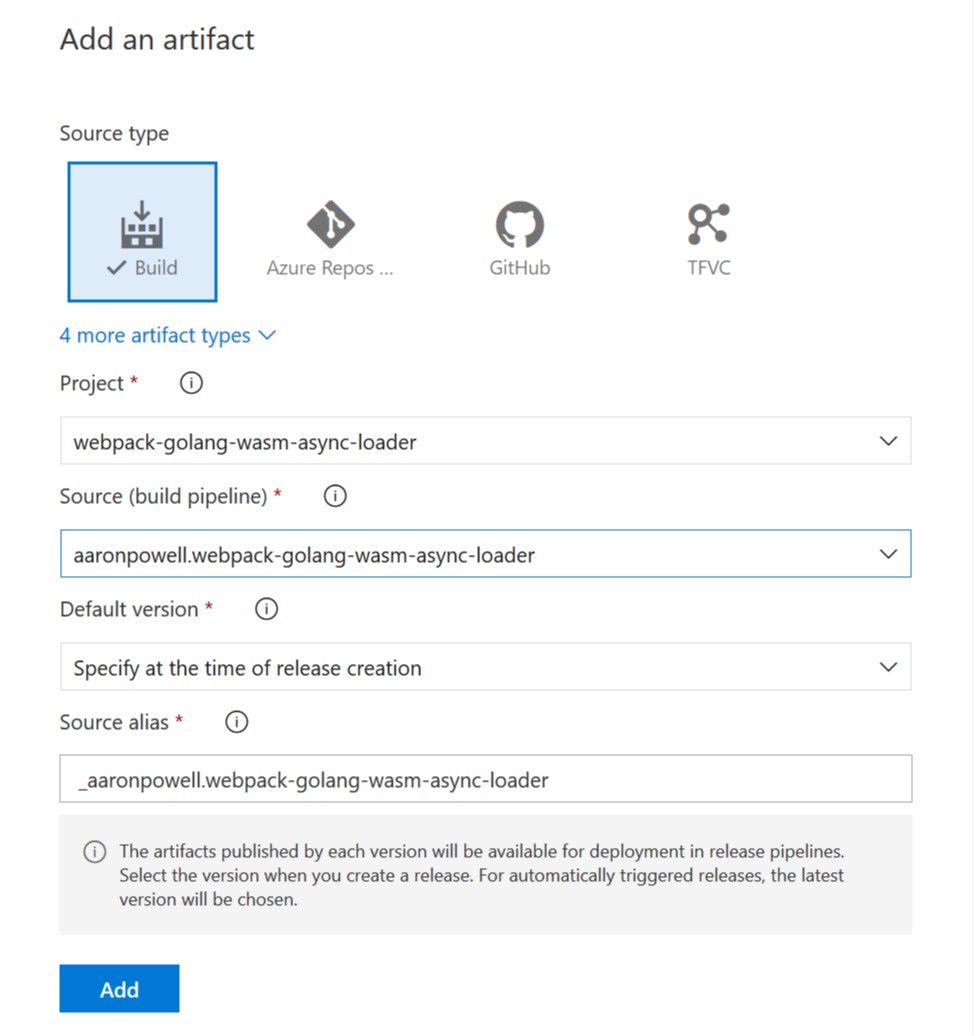
Note: I leave the Default Version as Specify at time of release creation as that gives the build control over the artifacts going in. For this scenario it doesn’t make a huge difference, but it can be useful in more complex setups.
Because we want a release to go out every time a build completes we’ll click the lightning bolt (⚡) on the artifact and enable the Continuous deployment trigger. Without this we’d need to manually trigger a release. If you had certain branches that shouldn’t ever cut a release (eg: gh-pages) then you can add a filter for them from here too.
Save, run, boom! Releases happening to npm on push to master. Just remember, you’ll always have to update your package.json to have a new version number, else it’ll fail to publish to npm, since you can’t publish an existing release.
Adding badges
The last thing you want to do is add a badge to your readme to show off the awesome pipeline work. We can do that from the Build -> menu in the top-right corner and select ‘Status Badge’ and get some markdown like this:
| |
And it looks like this:
Customising the label
I only recently found out that you can customise the text int he label for the Azure Pipelines badge. To do that add a query string to the image of label=<something cool>. It can even support an emoji 😉!
| |
Bonus round, releasing to GitHub
Releasing to npm is good and all, but what if we wanted to also publish the release to GitHub, tag the commit correctly and ensure that anyone who just wants to get the raw files can get them?
Well that we can also do with Azure DevOps!
First we’re going to need to grab the version number of our release so that we can tag it appropriately on GitHub. I’ll use the Bash task (since I know I’m using a Linux agent) and just run an inline script:
| |
I’m running a little inline Node.js script to get the version number from the package.json file that we attached as an artifact (so I set the working directory to $(System.DefaultWorkingDirectory)/aaronpowell.webpack-golang-wasm-async-loader/npm), alternatively, you could grab it from the unpacked tgz file (but I started this before I realised that I’d have to do that 😛). Next we use echo to create an Azure DevOps variable named packageVersion.
Then we’ll use the GitHub Release task (which is in preview at time of writing) to generate our release.
I choose what GitHub account I’ll publish under and the repository to release to (both show be available in the drop down lists), we’ll use Create for the action (it’s a new release after all) the Target is $(Build.SourceVersion) as that is the SHA of the commit the build was triggered for and that we want to tag, use our variable $(packageVersion) as the Tag with a Tag Source of User specified tag and then set the assets to the artifacts we want published (I publish the tgz and the generated JavaScript). I also chose to add Release Notes which I write into a file called ReleaseNotes.md in the git repo and publish as an artifact.
Now when we create a release it not only goes to npm but it also goes to GitHub as a release, tags the commit and links the commits included in the release. Check it out here.
Conclusion
And that is how we can do automated build and release of packages to npm and GitHub Releases from Azure DevOps. It really is quite simple!
Commentary on 2FA for Publish
My colleague Tierney Cyren pointed out that the above will not work if you’re using 2FA on Publish within npm. One possible workaround would be to have a manual gate on the release where you have to enter the OTP code as a variable before running the release and passing it as the CLI flag on publish. Otherwise, you’ll have an error such as this one in your release.