When I was consulting something that was done early on in many projects was to integrate some monitoring/logging platform. This would be used to help give insights into common scenarios such as how long IO took, trace data flows within the application or handling expected and unexpected errors. All of this would be baked into our API endpoints and generally just ran smoothly.
But there would always be one place that it wasn’t prioritized, the browser. Sometimes Google Analytics would be integrated (or if you wanted some real fun do it with plain old CSS), but that was more if it was a public website/marketing site, and really only focused on traffic sources, not true monitoring.
Today, I wanted to have a look at how we can setup up a monitoring solution of React using Azure AppInsights.
What is AppInsights
AppInsights (Application Insights in its long-form) is part of the Azure Monitor platform and is a performance monitoring platform that can be used in applications from web to mobile, across a number of languages.
While I won’t cover all the features of it here, the most interesting features that it has for a web application (SPA or otherwise) is capturing information such as page views, errors (handled and unhandled) and AJAX calls (XML HTTP Request and Fetch). Combining this both client and server can make it useful to provide a full view of a user’s interactions on your site.
Getting Started
For this demo I’m using a Gatsby e-commerce starter kit and you’ll find the completed demo on my GitHub.
I’ve extended it to use the JavaScript SDK for AppInsights which just so happens to have a React extension.
Configuring AppInsights
First things first, we need to have an AppInsights instance which we can use, and to do that you’ll need to create a resource in Azure (if you don’t already have an Azure account you can sign up for a free trial) and copy the instrumentation key.
Once you have the instrumentation key create a .env.development file to set up the environment variable that Gatsby will look for:
| |
Now we’re ready to start integrating AppInsights into our application, and we’ll start by creating a service that will setup the instrumentation for us:
| |
This file is responsible for two things, the first is to set up the AppInsights connection using the key provided (we’re using an environment variable to store this which allows us to use a different one on each environment) and the second job is to export a Higher Order Component (HOC) that provides our AppInsights instance to the HOC provided by the React extension (this is just a convenience approach, you don’t need to wrap the HOC if you’d prefer not to add additional components).
The main difference here from the documentation of the React extension is providing the history information. Gatsby uses @reach/router not react-router, so we don’t create the history object, we use the one that the router defines for us (exposed as globalHistory from the @reach/router package).
Tracking Pages
With AppInsights now available in our application let’s start by enabling it on all pages so that we can track page visits and any unhandled errors. The best place for us to do this is on the top-most component that we have access to, normally this would be you’re <App /> component that goes into the DOM. With Gatsby we don’t have access to that component, instead would use the files in the pages directory, but with this template we’re modifying the components/Layout rather than any of the pages since <Layout /> is the topmost component used on every page.
We’ll wrap the component with our HOC like so:
| |
If you start navigating around and look into your developer tools Network tab you’ll see requests being made to AppInsights!
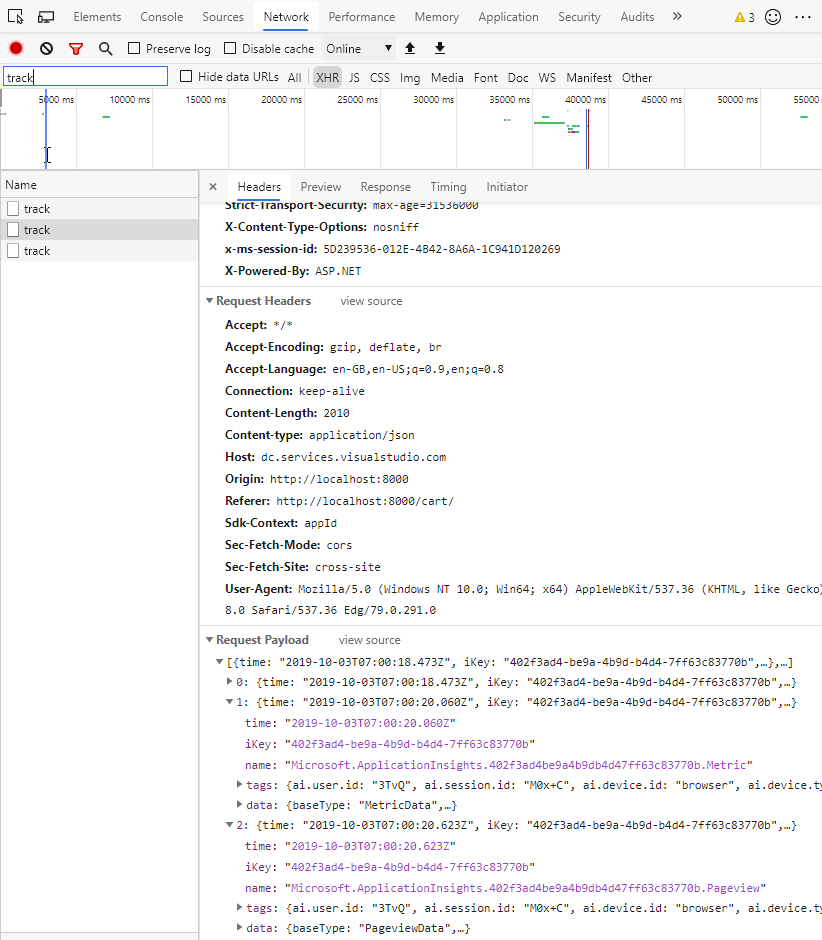
In the above screenshot I have a few objects in the output payload (AppInsights batches requests to upload metrics ever 15000ms which is configurable), one of which is the metrics information for the previous page we were on (how long the component was mounted for) with the other being the navigation event.
It’s worth noting that you don’t have to wrap the whole page, you can just wrap the specific components that you want to track instead. The HOC provided by the React extension will wrap your component in a <div> and attach event handles to user interaction events (such as click, mouse movement and touch) so that it can track the event of “when the component was interacted with”. When the HOC is unmounted it will send metrics to AppInsights about how long the component was interacted with. Here we’re combining Page View and Component Interaction into a single example.
Now we’re starting to track how long a user spends on a page and what pages they have visited, let’s have a look at some specialised monitoring.
Monitoring Specific User Interactions
Let’s say you’re trying to understand user behaviour on the site and you want to know about specific actions, such clicking the “Add to Cart” button. To do this we can use the trackEvent custom metric tracking:
| |
Here we’re using the appInsights object that we are exporting from where we set up the AppInsights instance and passing through some data to trackEvent, the name of the event we’re tracking (which we can filter on in the Azure Portal) and then any custom properties we want to include in the event. Here we’re passing through the productId, so you could determine how frequently a specific product is added to carts, but you could add any information that would be useful to understand and provide context to the event.
Monitoring Failures
Applications do have bugs, it’s a fact of life, but we want to know when those failures happen. When these happen in JavaScript it’s often not captured, they may be completely silent to the user and result in interactions failing until they reload the page. The AppInsights JavaScript SDK captures unhandled exceptions that trigger window.onerror (and if this PR is merged unhandled promise rejections), but what about errors that we can handle? maybe a network request failed and we showed the user a message, we might want to try and track that event so we can correlate client and server metrics.
To do this we can use the trackException method:
| |
Here at the end of the Promise catch we’re calling trackException and passing in an object that contains the error information and a severityLevel for the event of Error. The severityLevel is important to control here as that can be used by Azure to trigger alerting rules defined in AppInsights and if it’s an error that’s originated server-side maybe you don’t want to double-trigger an alert.
Viewing Metrics in Azure
Now that we’re starting to generate metrics as we navigate around the site, let’s head over to the Azure Portal, navigate to our AppInsights resource and select Log (Analytics) under the Monitoring section.
This is a place where you can create queries against the AppInsights data that is being captured from your application and it has a reasonably easy to pick up query language. We’ll start with a simple query to show some page views:
pageViews
| limit 50
This opens the pageViews table and we use the pipe (|) character to denote commands, in this case, the command we’re executing limit command with a value of 50, which limits the number of results returned in the query to 50.
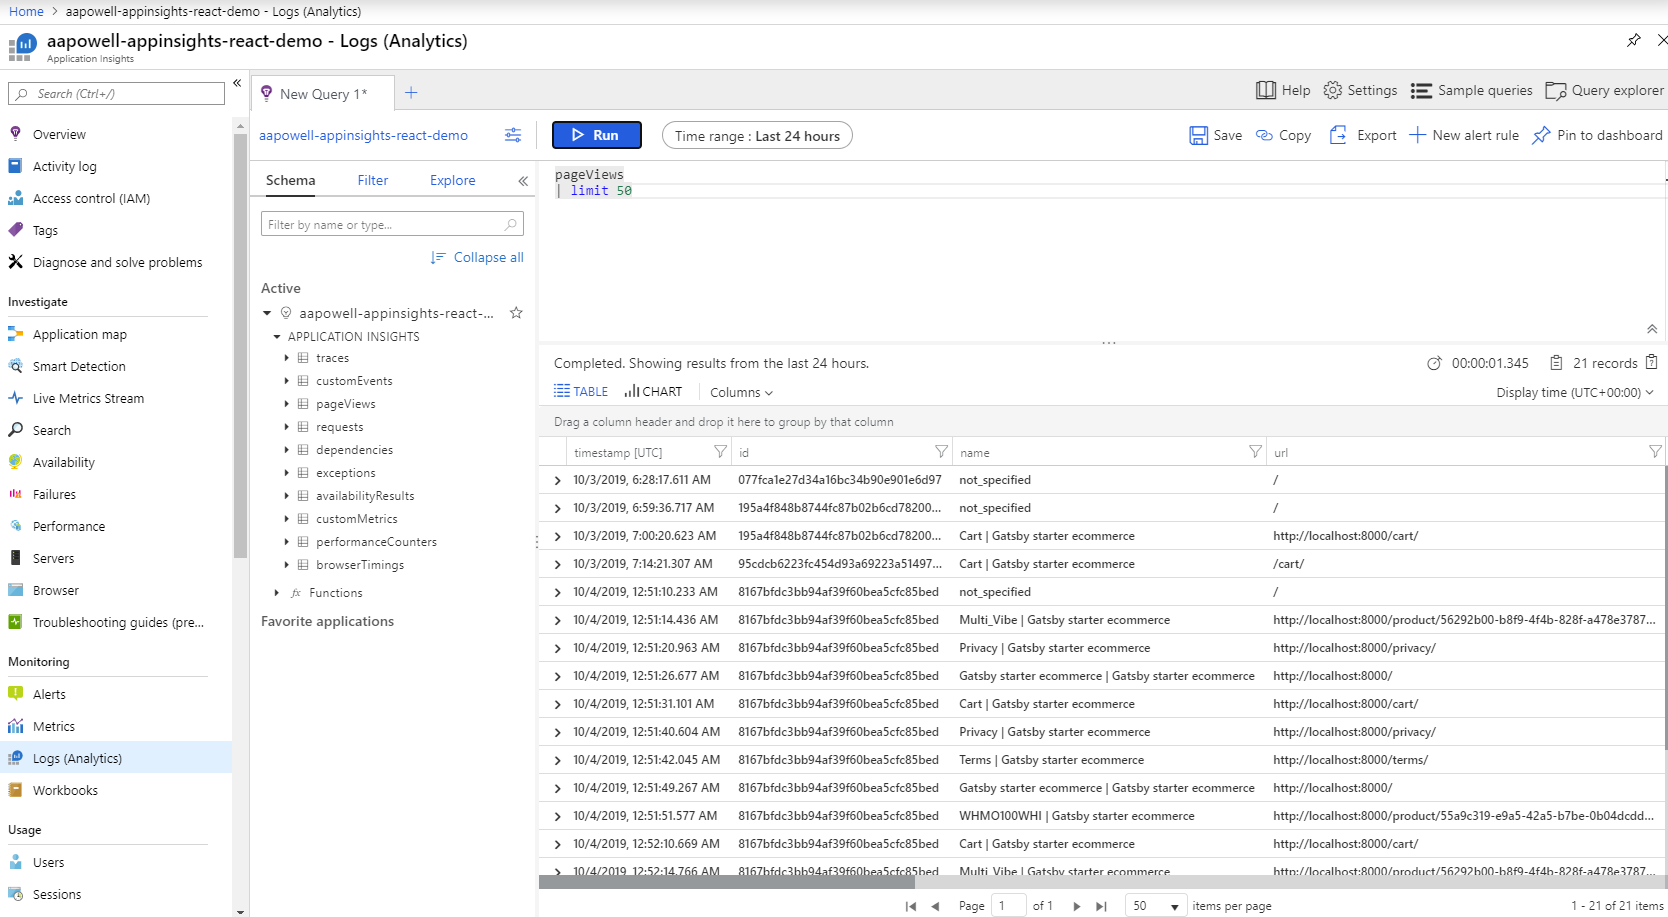
The screenshot shows the returned results, in which we see a bunch of pages which I navigated around.
Let’s look at our custom event, tracking the clicks on the Add to Cart button:
customEvents
| where name == "Add To Cart"
| limit 50
For this query we open the customEvents table, since it wasn’t a predefined metric type and add a where filter against the name to limit it to Add To Cart.
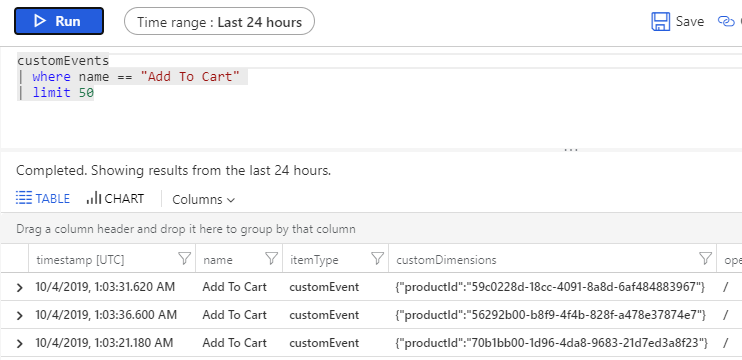
There we can see three Add To Cart operations, and which products were added to the cart. With the query you could expand the condition clauses to look for specific products or any other information you’ve captured on the event.
Conclusion
This post has given us an introduction to Azure AppInsights, and in particular the React extension. We’ve seen how to integrate page view tracking as well as tracking custom metrics against specific interactions and finally error tracking, before looking at how we can start viewing that data in the Azure Portal.