Like many people, I’ve started streaming on Twitch, and like many people, I might not have really thought about what I was getting myself into when I started doing it.
My main machine is a Surface Book 2 i7 with 16GB of memory, which is more than adequate for day-to-day work but this doesn’t mean that it’s the right thing to try and run a streaming setup. As soon as I fire up OBS and have a few apps running, things start grinding to a halt. You can see this on a few of my early streams, some operations that should take seconds, started taking minutes (like opening a browser tab). This results in a sub-optimal experience as a content creator and as a viewer, so I decided to try and solve it.
But there’s a catch, I don’t have a huge pile of money sitting around for me to drop on building a super powerful streaming PC, so I needed to think about how to do this as cheaply as possible, which is what I want to talk through today.
Why use a streaming PC
Before we get started in the how, it’s a good idea to talk about the why, why would you need a streaming PC?
To stream, or even to do offline video production, you need to run some software which is generally going to be resource intensive on the machine. Whether it’s OBS, Camtasia, Adobe Premiere or anything like that, you’re going to be running software that is doing video encoding, and that will be either CPU or GPU bound. With a desktop, this is less of a problem, you’ll have a dedicated GPU, but in a laptop you either don’t have a dedicated GPU or the dedicated GPU isn’t the most powerful thing available.
This is the case with the Surface Book 2. It’s got a dedicated GPU, and it’s ok, but not great, so the more the system is loaded up with resource demands, the less available resources there are for the software you’re wanting to record.
Enter a streaming PC. The idea here is that you offload the production side of your content creation to a separate machine and by doing so, freeing up resources on your primary machine.
Having a dedicated streaming PC does complicate things though, as you now need to work out how you’re going to get whatever it is you’re displaying on your main machine across to the streaming PC, plus your mic and camera feeds, and this is where things start getting expensive though the use of capture cards, XLR mics, etc.
So let’s look at doing it cheaply.
The streaming PC
I’m a technology hoarder, I don’t get rid of devices when they’ve outlived their usefulness and this means that I have a stack of old laptops around. I’ve got 2x Surface Pro 4 on my desk (as well as 2x Surface 3, a Lenovo Helix, Sony Vaio, Macbook Pro (circa 2008), Surface Pro 1, 2x Surface RT 2 and a desktop (which hasn’t worked for ~6 years) scattered around the house) and I figured that the Pro 4 should be a viable enough device for some basic video production like I need. After all, I had used it in the past to do video production, but it was much more simplistic production that I’m trying to do today.
Side note, I do have 2x Pi 3 on my desk as well, and it did cross my mind to use that, but I decided against it, they are a bit too underpowered.
So an old laptop is a decent enough option when it comes to creating a streaming PC, it doesn’t matter if you’re running 80% CPU while streaming with the fans sounding like an aircraft about to take off, it’s only job is to run the stream and if the fans are too noisy, well it doesn’t need to be on your desk, pop it on the floor.
Streaming to a streaming PC
Finding an old laptop that can run OBS (or any video creation software) is the easy part, now comes the confusing one, how do you get your screen from your main device to your streaming PC?
Well, the basic idea is that you need to turn an external monitor into an input that can be received by your streaming PC and for this we’d use a capture card.
If you’ve started to look at making a streaming PC, chances are you’ve looked at something like the Elgato HD60. Cards like this were popularised as a way to get the feed from a console into a PC to do post-production on, but the principal is the same for a PC to PC streaming, it takes a HDMI in and turns it into an available source (often represented as a camera) that you can use within your production software.
But that requires a proper PC (not to mention expensive), and we’re repurposing an old laptop, so we need to think a bit more creatively.
Enter the HDMI to USB converter.
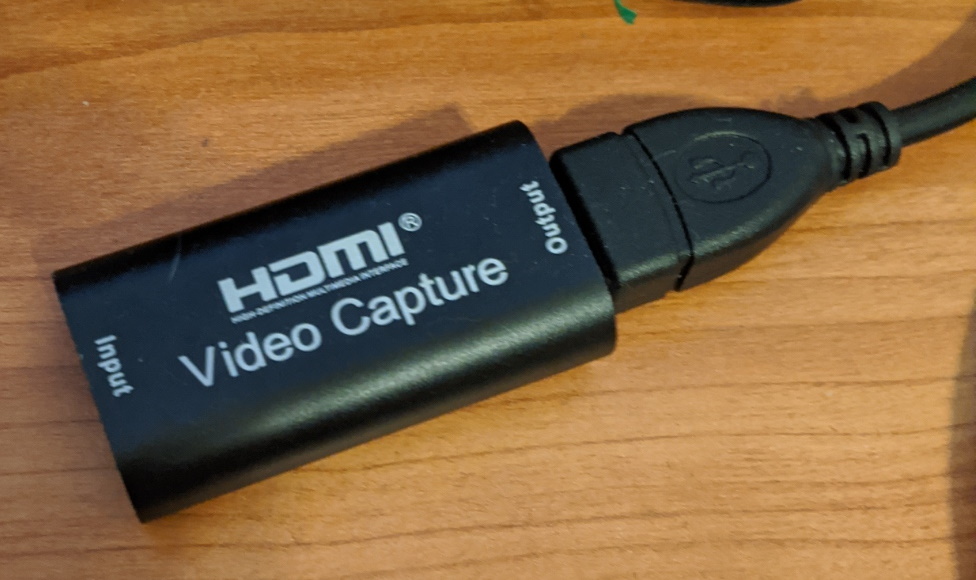
This little device takes a HDMI input and then converts it into a USB feed which can then be plugged into a USB port on my laptop. It’s commonly used to capture the output of a DSLR or other professional camera and then feed it into a computer, but HDMI is HDMI, so there’s no reason that we can’t feed our main device in.
Elgato has one of these, it’s called Cam Link 4K and it’s hard to find availability of, plus it’s a few hundred dollars, so it’s not ideal for being overly price sensitive. But over the last few months there has been a flood on the market of really cheap HDMI to USB devices, and I picked up this one for around $40AUD delivered.
Sure, the quality isn’t as high as you’ll get out of a more expensive device, but it’s fit for purpose and at a viable price point that you can work to overcome the quality loss between your main device and streaming device. Would I game with it? No, but showing VS Code and a reasonably unchanging screen, it works well enough.
Monitors everywhere
So we’ve got a device that will take a HDMI input and make it available via USB for our streaming PC, but how do we do that? As soon as you plug in your HDMI cable Windows will detect it as an external monitor and you can now push to it, but that might not be idea because that monitor doesn’t really exist does it? At best, you could look at your streaming PC on the desk next to you, but if you’ve put that laptop on the floor, well now it’s really hard to look at!
Here we can exploit how Windows multi-display setup works. Now normally you’d have a multi-monitor setup in extended mode so each screen is independent, but that’s no good for our capture device, instead we can extend to one and duplicate the other (assuming you’re already running an external screen).
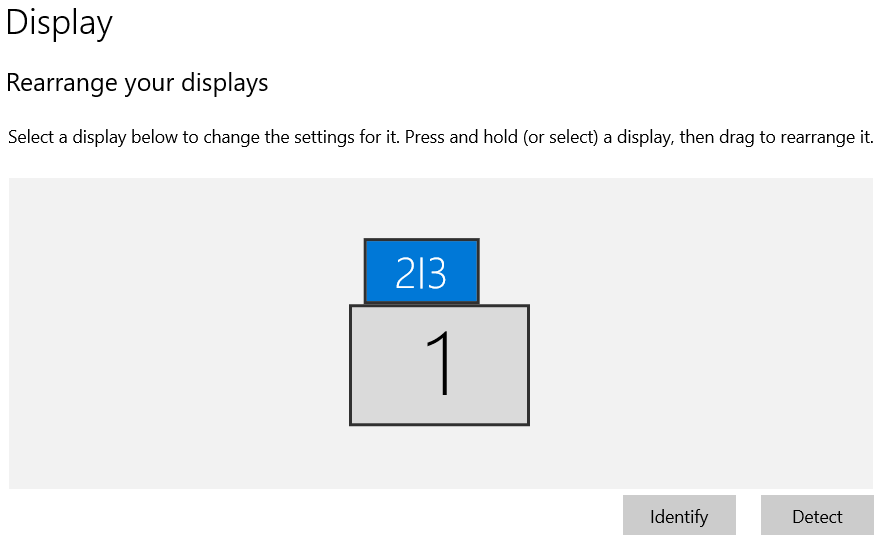
This is my layout, I have a stacked monitor setup with my laptop on the desk and 32" external above it. Within Windows display settings you can select a monitor and under the Multiple Displays choose to duplicate an external monitor to another external, which is just what I did, monitors 2 (my 32") and 3 (my HDMI to USB) are the same thing.
This does mean I have to drop the resolution down to 1920x1080, which is what the HDMI to USB accepts, but that’s fine as I’m not going to stream at a higher resolution that that to Twitch anyway.
Now whatever I do on my external monitor is being pushed over to my streaming PC, ready to be pumped out to the world on Twitch!
Hear me, see me
We’re setup to stream our screen but that’s only part of the puzzle, you probably want people to be able to see your camera feed and hear you on your mic. We need to make these available to our streaming PC, but we probably also want them on our main device for the endless hours of video calls we’re all doing now, and you don’t want to be fumbling to rewire your USB setup every time someone calls you up to pair program do you?
Don’t worry though, there’s a solution for that, a USB switch! I picked this one up for about $50AUD delivered and it allows me to plug in 4 devices and switch them easily between my two laptops.
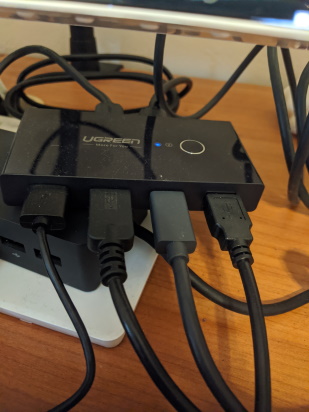
So now I have my webcam, mic and stream deck all plugged into the switch, which is then plugged into my Surface Dock (for my Book 2) and then directly into my Pro 4 and with a press of a button I can swap which machine they are connected to.
Quick aside, I also connect my HDMI to USB through the switch too, but that’s because my Pro 4 has only a single USB input, but if you have multiple USB inputs then use them as I’m pretty much maxing out the USB bus!
Conclusion
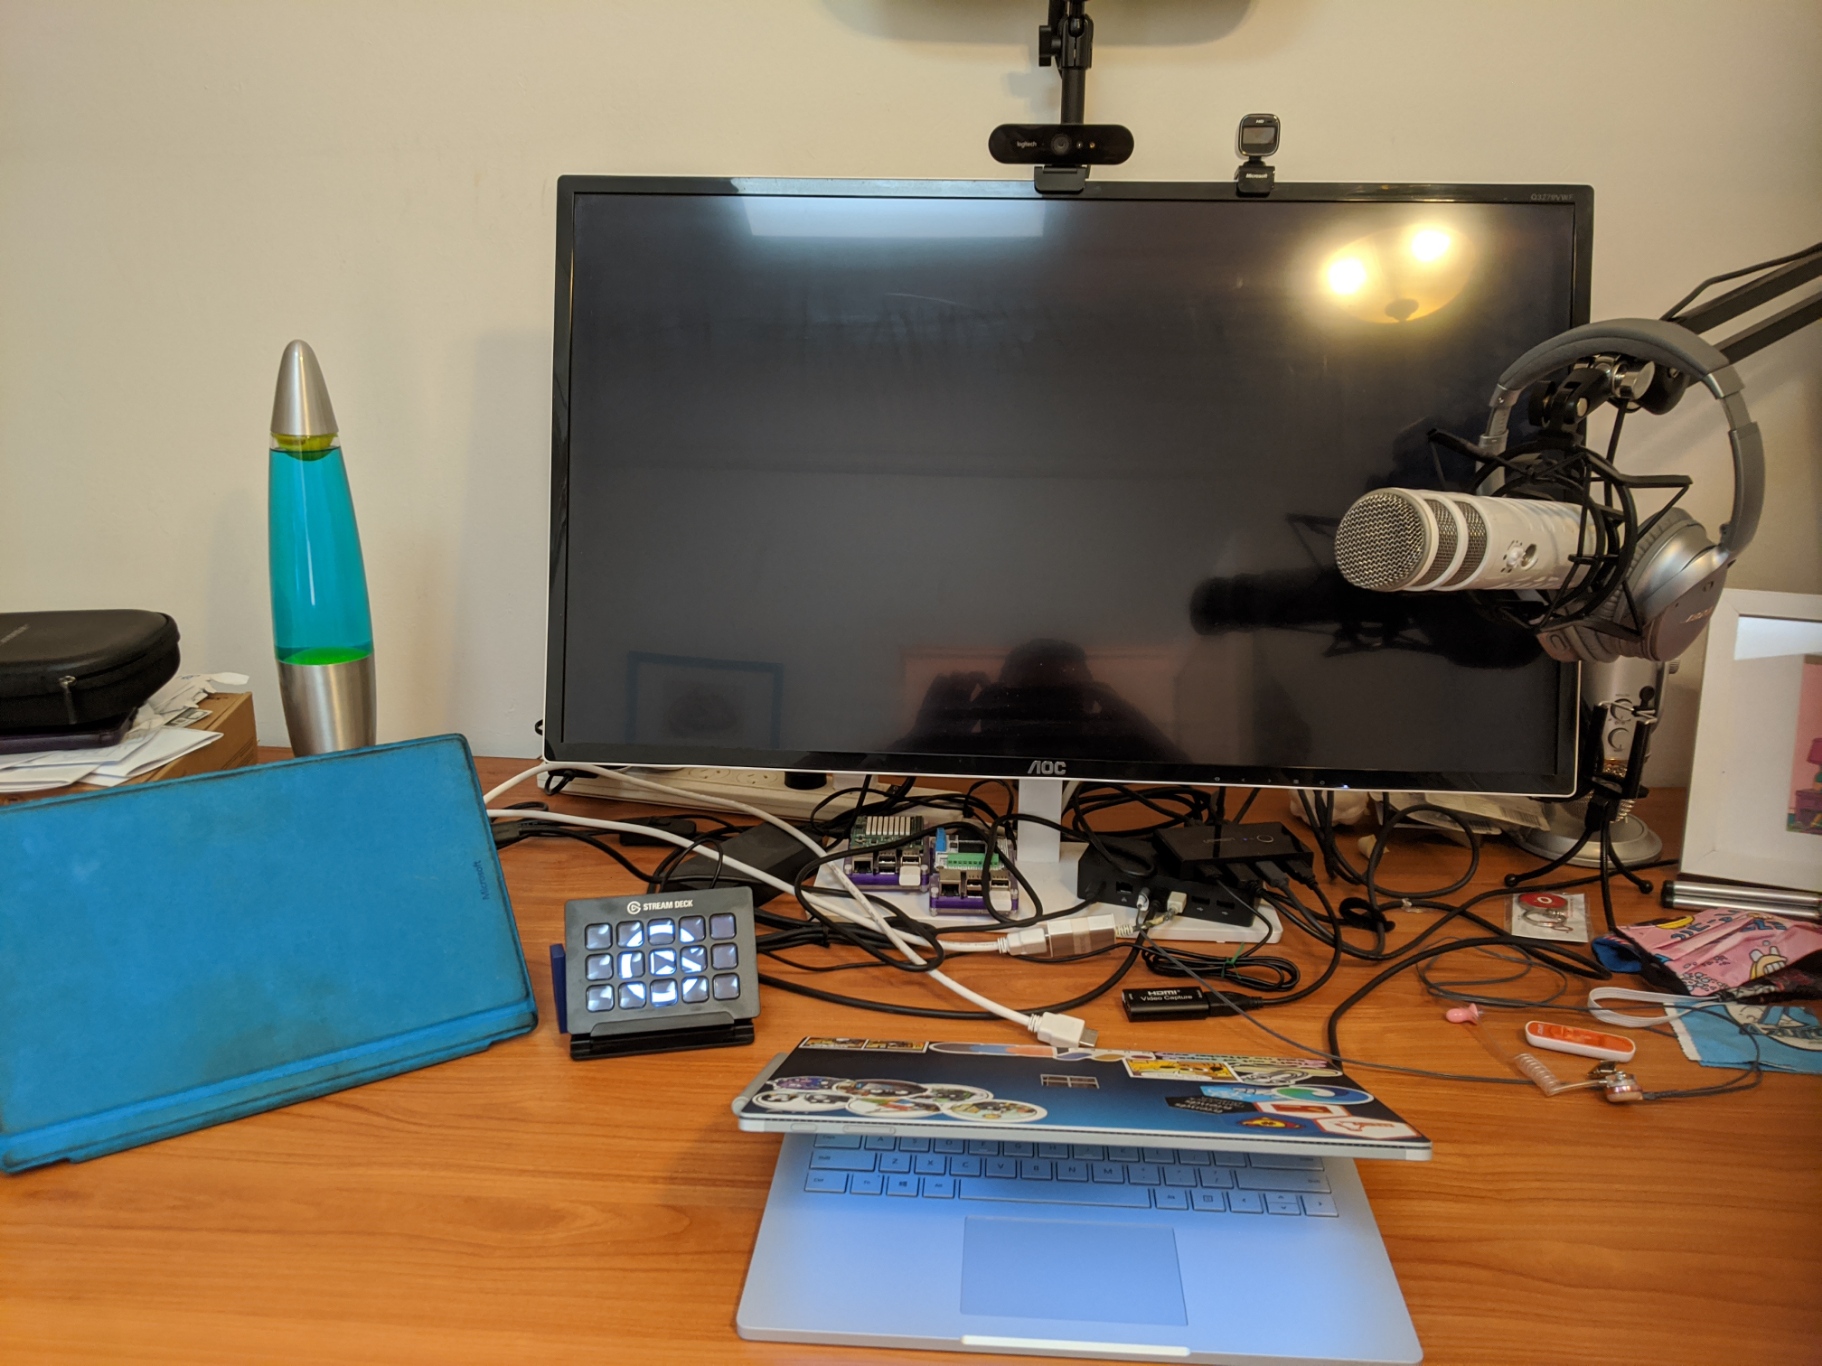
This is my streaming setup (well normally the laptop lid is up, but that’d hide the cables in the photo), my Surface Book 2 connects to a Surface Dock, which connects an external display + HDMI to USB converter, that feeds the 3rd monitor stream into a USB switch that my camera, mic and stream deck are connected to and allows me to switch between which device they are available for. I then have a repurposed Surface Pro 4 that takes these 4 USB devices in via a single USB input, runs OBS and sends the stream up to Twitch or records locally (depending on my needs).
All in all, I spent a little under $100AUD to set this up. I already had the old laptop to use, so being able to improve the quality of my stream for that little money does seem like money well spent and hopefully it shows you how you too can improve the quality of your stream without breaking the bank.
And do you want to see how it turns out? Drop by my stream each Friday lunch time.