On my Twitch channel we’re continuing to build our video chat application on Azure Communication Services (ACS).
For today’s post, we’re going to look at the next major milestone, accessing your camera and microphone.
How Browsers Access Devices
We’re going to use the ACS SDK to do this, but before we get there let’s first understand how we access cameras and microphones in the browser. Browsers have had this functionality for a while now, it came about as a need for the WebRTC specification, since that allows you to do what we’re doing, run a video stream through the browser, and it works using the navigator.mediaDevices API which replaced navigator.getUserMedia.
This API is promised based, so it works nicely with async/await, and will return us the MediaStream available to the browser.
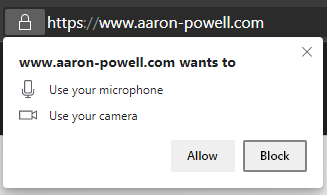
There is a catch though, the user has to consent to providing access to the devices, which makes sense as you don’t want any random website to be able to access your camera and mic without you knowing about it, do you? The user will see a prompt like so:
In “raw JavaScript” we’d write something like this:
| |
If the user denies the request then the catch of the promise is triggered (or if they’ve previously denied it), otherwise you’ll end up in the MediaStream for the camera/mic they have selected. The MediaStream can be provided to a <video> element and you can look at yourself.
Accessing Devices with ACS
Now that we understand the fundamentals, let’s look at how we use this in the ACS SDK to get one step closer to establishing out video call.
We’ll need to add some npm packages to our UI:
| |
With these packages, we’re going to need four APIs, AzureCommunicationUserCredential, CallClient, CallAgent and DeviceManager.
To make the important parts of this available throughout our application, we’re going to create a React Context to hold it, so let’s get started with that.
Defining Our Context
Let’s create a file called useCallingContext.tsx since we’ll have the context in there as well as a hook to access context, and define our context:
| |
The context will have available on it the list of cameras and mics, along with the CallAgent and DeviceManager instances since they will be useful later.
Since the logic to setup all the data available on the context only happens once, we’ll implement the context provider within this file to, so let’s do that.
| |
Lastly, we’ll expose a hook to make it easy to access the context elsewhere in the application:
| |
Great, we’re now ready to implement the context provider.
Implementing the Context Provider
The context provider here is key, as it’s the thing that’ll be responsible for getting the devices and making them available elsewhere in our application, and for that we’re going to need some local state.
| |
We’re going to need the token that is generated for the user in Part 1, and we’re doing that through a custom hook:
| |
Then we’ve got some more state for the different parts of the ACS SDK that we’re going to expose, except for the CallClient which we only need to establish the other parts of the API.
We’ll use an effect hook to set this up, that’ll be triggered when the token is available to us:
| |
Ok, that’s a lot of code, let’s break it down piece by piece, starting at the bottom:
| |
This is a check to make sure that the user token has been issued, and once it has been we’re going to call an async function (run), because an effect hook can’t take an async function directly, and the run function is really where things happen.
First off, this function is going to create the credentials for ACS from the token provided:
| |
Next, we’ll setup a try/catch block to access the devices, and remember that the reason we’d do it this way is so that if the user declines the request to access devices, we can gracefully handle the error (the async/await unwraps a promises catch into the catch of the try/catch block).
We’ll create the callAgent using the credentials:
| |
We’re not actually using the callAgent yet, it’s what we use to connect to calls, but we need to create an instance of it before we access the DeviceManager. I’m unclear as to why it’s this way, and it’s something I’m going to raise with the ACS team.
With our callAgent created, it’s now time to access the DeviceManager, which will give us all the devices:
| |
From the deviceManager, which we get from callClient.getDeviceManager, we need to request permissions from the user to access their device list using askDevicePermissions. This method takes two arguments, whether you want audio and video access, and for our case we do. Assuming the user grants permissions, we can then use deviceManager.getMicrophoneList and deviceManager.getCameraList to get arrays of AudioDeviceInfo and VideoDeviceInfo that we can present to the user for their selection.
This is the same as if you were to call the enumerateDevices method from MediaDevices, but the SDK takes the liberty of splitting the enumerated devices into their appropriate types. What’s important to know about this is that you must call askDevicePermissions first, otherwise you’ll get an array with a single unknown device. That’s because enumerateDevices, which is what’s used internally by the SDK, accesses the available devices without prompting for consent and if consent hasn’t been provided, you can’t get the devices.
Conclusion
Our React context is all ready for integration into the application. We’ve learnt how to get started using the ACS SDK and its DeviceManager to request permission for the devices and then display the full list of them.
If you want to catch up on the whole episode, as well as look at how we integrate this into the overall React application, you can catch the recording on YouTube, along with the full playlist