When we got our new house built, we decided to hold off putting in feature lights because we wanted to see the space first and then decide what we wanted in each of the areas as features. Fast forward a few months of occupancy and we’d selected our feature lights and booked the electrician to come and install them. And since we had an electrician coming to do some work, I felt it was an opportune time to get onto the next smart home job - lighting.
Note: In Australia it’s illegal for anyone other than a licensed electrician to work on electrical wiring. Because I’m not a licensed electrician I won’t explain how the wiring is done, just what I’m doing once it is done.
Smart light bulbs
I dislike smart light bulbs for the most part because they rely on a powered circuit to work, which means that a wall switch will turn them off and you can’t use them in automations or for anything smart until you turn the switch back on. Because of this, I’ve actively avoided them in all but two places - our kids lamps. The kids lamps are in their rooms and I decided to get them smart bulbs so they can use the lamps as night light, or to have them do fun colours when they have friends over if the want. I got WiZ LED bulbs from Bunnings because they have an integration for Home Assistant out of the box. The one in my eldest’s room works pretty much flawlessly, whereas the one in my youngest’s room drops from the wifi network constantly (I’ve put an automation in place that sends me a push notification when it goes offline so I can reboot it - and yes, it has a static IP, I think it’s just a dodgy device).
Making dumb lights smart
Keeping true to my ethos of Human Centred Design, we have to make the lights work for everyone, not just the household techy. Also, since we just built the house, and decided to get some nice quality light switches everywhere, I didn’t want to replace everything with the “futuristic” smart switches - I like the tactile feedback of flipping the switch, so that needs to keep working (not to mention people expect switch to work a certain way - hence the Human Centred Design bit).
To make the lights “smart” I decided to go with Shelly smart relays.

I went with Shelly devices because I know a lot of folks already using them and they have great integration with Home Assistant. I picked up a deal via Oz Smart Things and got a bunch of Shelly 1 and 2.5 devices. We’ve got everything from a single switch to quad plates, so I need a range of devices. In hindsight, I should have gotten the 1PM instead of the 1 so that I’d get the power monitoring (the 2.5 have it), but really, it’s not that important.
The way the Shelly devices work is they sit between the switch and the light (or whatever is on the circuit) and when the switch is flipped you can control what the relay does. The simplest mode is to just change the state of the relay, so when the switch is flipped the relay turns on or off and the light turns on or off. Great, this solves the most basic UX aspect - the switch still works, but it gives the added benefit that I can also yell at the Google Assistants around the house to turn lights off.
Which Shelly mode to use
There are two main settings that I tweak with my Shelly devices, the Power On Default Mode and Button Type.
For the Power On Default Mode I’ve set the switches all to be Restore Last Mode. This means that in the event of a power outage the state of the light will be restored to what it was when the power went out, so if it’s the middle of the night, we won’t all be suddenly woken up because the lights came on. You could alternatively use the SWITCH mode, but that will then rely on the position of the switch to dictate what the relay does, and since we don’t always use the switches to turn on/off the lights, you could end up in a situation where the lights come on unexpectedly.
For the Button Type, I originally set them to Toggle Switch, but that can see states getting out of sync, especially if you remotely change the relay state - now the switch and relay don’t match so you have to flip the switch to get it back to the right state (which is annoying and would likely cause confusion). Instead, I use the Edge Switch button type, which means that every flip of the switch changes the state, regardless of whether the switch is in the “on” or “off” positions (basically we don’t have “on” or “off” anymore on the switches).
But for a few of the devices I have set them to Detached Switch for the Button Type and this disconnects the switch from the relay, meaning that when the switch changes state, the relay doesn’t change state, you have to do something entirely “programmatically” now, and this comes to the automation’s.
Automations
As “fun” as it is to be able to yell at the house and have a light turn on or off, the real reason I put the Shelly’s in was to be able to do some automations with them, so let me share some of the ones I’ve setup and that seem useful (and that my wife also finds useful!). So far they are all pretty basic, but they are tackling the little improvements to life that I want out of a smart home.
Automatic lights in storage
We have a storage room under our stairs, very Harry Potter esq, and it’s got a light in there as there’s no window. We’d constantly be forgetting to turn the light off when closing the door, so a period of time later one of us would notice a faint glow under the door and turn it off. Not a major inconvenience or anything, but it’s one of those little things that would be nice to not have to think about.
The idea for this automation is that when the door is opened, the light turns on, and when the door is closed, the light turns off (with a little delay). To know when the door is opened I attached an Aqara Door Sensor to the top of the door. Now, when the door is opened, the sensor triggers and we can run an automation:
| |
Rather than having two automations, one for “open” and one for “close”, I combine them in a single automation and use the state of the contact sensor to call the appropriate light service in Home Assistant. I also added a delay on the door close of 30s so that if you close and then immediately need to go back in, you won’t be running the automation constantly.
I use a similar automation to this for the garage internal door, with the additional condition that it only runs if the roller door is closed or it’s night time, as otherwise we don’t really need the additional lighting.
Media room lights
For the media room I’ve setup an automation that when you pause (or stop) what’s playing on the TV it will turn the light on:
| |
The idea behind this is that if you’ve paused what you’re watching, it’s likely that you’re about to get up anyway so bringing the light on means you can see where you’re going. I also added a 5s delay to try and catch some of the edge cases when swapping shows. I also added a condition to check that the lights are off, since there’s no reason to turn a light on if there is already a light on.
This automation isn’t perfect as it can be a bit aggressive in turning the lights on if you’ve moving from one streaming provider to another, or swapping from watching something to playing Xbox, but it’s better than nothing and I just need to do some debugging on the various states the TV reports to HA.
Lighting in the parents bedroom
No, not that kind of lighting, I’m waiting for the LED strips to come… I’ve said too much 😳.
Something that often annoys me about bedroom lighting is that the light switch is near the door, but the bed is generally isn’t, so when you flip the lights off you walk across the room in the dark, hoping you don’t stub your toe on the end of the bed. Sure, you could install additional switches or turn on a lamp beforehand, but that’s not as “techy”.
So for the Shelly that’s controlling these lights I’ve set the Button Type to Detached Switch. Using this mode means you need to enable the Input sensors in Home Assistant. My sensor list looks like this for the Shelly 2.5 that controls the two sets of lights in our bedroom:
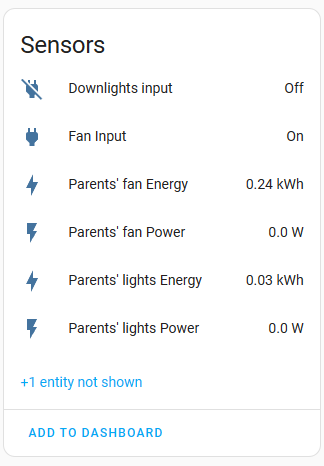
Now the switches will change the state of the Input sensor, but that doesn’t change the relay, so the switch does nothing. Instead we need an automation to be triggered on the state change to the Input that will either turn the light on or will put a 10s delay before turning the light off. I’ve also configured this delay to only be for after 9pm, so in the morning or other times, the lights will toggle immediately when the switch is flipped.
| |
It’s a bit of a clunky automation because I have nested if actions, but I’ve not thought of a better way to inject the 10s delay conditionally like this.
Initially, my wife thought this automation was a total gimmick, but she’s come to find it really useful, as her side of the bed is the one furthest from the door (and she’s the one most likely to leave clothes on the floor 😝).
Making our ceiling fans smarter
Earlier in this series I wrote about making the ceiling fans smatter but there was one fundamental flaw in the design - the wall switch would cut power to the circuit, turning the light off, but also turning the fan off. It also meant that if we’d turned the light off using a voice command or automation, the switch couldn’t be used to turn it back on. Since I implemented this design, the family, including the kids, are mostly trained on how it works, but sometimes there’d be shouting at Google to turn the light on, nothing happening and then shouting at me to fix it 🤣 (which generally involved flipping the switch so the circuit was powered again).
I wanted to fix this, and I’ve been able to do this with the use of a Shelly in Detached Switch mode and an automation.
| |
This automation is a bit more complex as it’s really doing two jobs - changing the state of the fan light, but also conditionally turning on their lamp with the Night Light effect.
When the switch is flipped, we determine if the fan light is currently on or off using the value_template on the if action, looking up to the variable light which is set based on the trigger.entity_id (the ID of the sensor that changed state). If the light is on, we then check the time to see if it’s after 6:45pm, and if it is, we turn on the lamp with the Night Light effect before turning the fan light off. If the fan light is off, we just turn it on.
In my first pass of this I had it calling the script that I use to do the RF blast, but then I was getting weird states when HA would think the light was on when it was actually off, because state was tracked weirdly, but since I created a Template Entity for the lights, we can just use the built-in light.turn_on and light.turn_off services, which will in turn call the scripts, so HA tracks it properly.
And with this design we never actually turn the relay off, so the circuit is always powered, the fan can be run through automations (or voice commands) at any time, and the switch can be used to turn the light on and off as expected.
I will add that there are occasions that this does fall over, sometimes the Broadlink fails to send the command and then HA thinks the light is off when it isn’t really, so then I have to get into HA, turn it off on the Shelly, fake turning the light off in HA to fix the state sync and then turn the Shelly back on. I can probably fix this with a better placement of the Broadlink device, but it happens infrequently enough that I’m not overly stressed.
Conclusion
There’s a few other automations that I have setup for the lights, such as one that will turn all lights off when we go to bed, one to turn on the front porch light when we’re out after dark, but they’re not that interesting.
I stand by my perspective that smart light bulbs, whether they are wifi, ZigBee, Z-Wave, BLE or other, they really require something additional in the circuit, so they best suited for special situations, in my case, lamps for our kids bedrooms.
But Shelly’s to control the lighting circuits, they’re great and work just as I need them to. I’ve only had one drop off the wifi network since installing and I had to issue a reconnect in the Unifi admin portal, but after that I issued them all with static IP addresses and haven’t had any problems.
I’m really happy that I was able to fix the pain point with our fan lights, and now they work as expected (… mostly), which is definitely improving the Spousal Acceptance Factor!
In the future I’d like to add some presence and luminosity sensors in a few of the rooms so we can move away from needing the switches at all, just having the lights adjust to the needs of the room, but that’s a project for another day.
The Shelly 2.5’s have Power Monitoring in them and I’ve been contemplating if I could use that feature to work out if the light and fan is on/off, rather than manually tracking state in Home Assistant, but it’ll take a bit of exploring to see if it’s possible to work out the power draw when the light is on vs when the fan is on (and on at different speeds).