I really like the idea of having a smart door lock on our front door, something about the peace of mind that I can know if they door is locked or not, control access and all those things, so getting a “smart” lock was something I started researching long before we moved into our new house (even before we had doors installed! 🤣).
I’m going to refer to the locks as “smart” in quotes as generally speaking the locks themselves aren’t smart, it’s the systems around them that you build that are. Calling it a “connected lock” is probably more accurate, but semantics.
Requirements
While there are a lot of options on the market it was important for me to get the right one, and everyone has opinions on what constitutes right, so here are the things that I looked at (initially - I changed some stances over time and I’ll explain why later):
- It integrates with our existing deadbolt
- It still have key access
- We can control who has access
- It’s not cloud enabled
- It integrates with Home Assistant
- I can control it from my phone
- It will report state
- I don’t feel like I’m entering an office building
Exploring Options
I started doing research around and a few of the early contenders were the Danalock v3 and the August Smart Lock. These both satisfied a lot of the criteria, they retrofit to an existing deadbolt by replacing the back, meaning that the front is still a standard lock (so keys can be used), they integrate into Home Assistant (through an additional hub admittedly but still) and they can be controlled via a phone. But their biggest win was that they didn’t change the look of your door, there was no visibility that you had a “smart” lock installed, which seemed like a good idea for reducing potential attack vectors.
Another even more enticing option is the Level Bolt, as it is completely hidden inside the doorframe, which seems really neat! But it looks like it’s mostly designed for the Apple ecosystem, which I’m not invested in, so I dropped it (it might be exposed via HomeKit to Home Assistant, but it’d still require more hoops than I’d like).
So there’s a variety of options out there, so let’s start thinking about the usability of them.
Managing Access
Now that I had some product options in mind, it was time to start thinking about just how we’d use the lock. The primary users of the house are myself and my wife (the kids don’t need to be able to let themselves in yet, they’re a bit young for that still), but then we have secondary users, such as our cleaner, our parents, when we’re away either a house sitter or friend who will look after the pets, and now the useability is becoming more complex.
Thinking of the model that the Danalock or August represent - an app centric approach, we’d either be having to “onboard” a lot of people of varying technical skills or handing out keys. Fundamentally, we want to reduce the number of keys in circulation, that’s part of the point of having keyless access, but this was not really going to solve it. And this was the main point I needed to overcome in what I wanted out of a “smart” lock.
Exploring Options… Again
I was initially very much against the idea of having a NFC fob, digital PIN or similar for the door, to me this seemed like it would be very… office-y, and it was a home, not an office (which yes, both my wife and I work from home, so it is an office… BUT THAT’S BESIDES THE POINT! 😝).
It turns out that all three options above had digital PIN pads that you can get as addons, but now it’s starting to look expensive and complex, a lock, a bridge and a PIN pad, so I went looking at integrated options.
I ended up coming across the Yale Assure Keyed lock as I knew a few people who recommended them, I think it looks fairly slick, and most of all, it’s 100% offline - no cloud connectivity, everything is managed on the device, from the PIN’s generated, the profiles, the time those PINs are valid for, etc. Yale is also a reasonably well known brand within the lock-space, so it was reassuring that it wasn’t likely a company that could vanish and leave me with an unusable produce (interesting aside, August is actually a sub-brand of Yale).
But because I wanted it integrated with Home Assistant, I picked up a ZigBee network module and organised for our locksmith to come out (you can install it yourself, but we have a family friend who’s a locksmith and they were going to upgrade all our locks from the ones the builder installed as he said they were all woefully bad 😅):
Call a locksmith! pic.twitter.com/kaRJi16Tm5
— Aaron Powell (@slace) August 29, 2022
Integrating with Home Assistant
Since I’m using the ZigBee network module, integration with HA was reasonably trivial, I installed the module, put it into pairing mode and it joined my network:
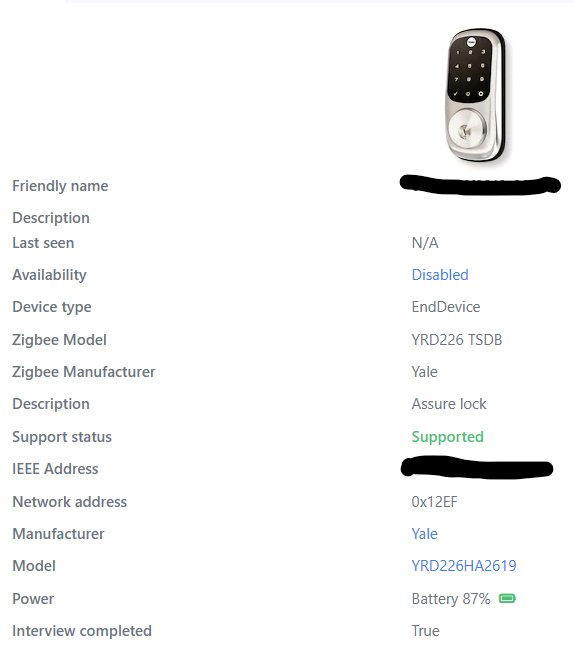
There’s a heap of stuff that is exposed via the integration from the lock:
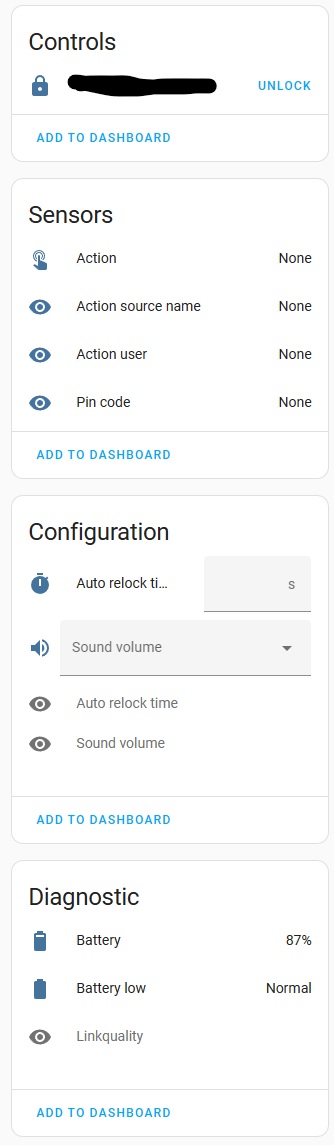
The control at the top is what you’d expect, an option to lock or unlock the lock, depending on its current state. The sensors are used it indicate that the lock is doing something, for example, when someone uses the PIN pad to unlock it will:
- Set the
Actiontounlock - Set the
Action source nametokeypad - Set the
Action userto the user ID that the PIN is associated with
These sensors are all then set to None immediately, so the value isn’t stored, but you could have an automation that triggers based on the (brief) state change.
I’m yet to play with the Configuration section, and Diagnostics is, well, just that - I only care about the battery level.
Automations
With the lock setup in HA we can now do automations with it and the first one I did was tackle a problem we had - forgetting to lock the door at night.
Auto-locking with NodeRED
For this one, I decided to experiment and use NodeRED, which is a visual workflow tool that can be used with HA (my friend Lars has a video on getting started if you want to check it out, but as an aside, I don’t really use NodeRED anymore, I find standard HA automations do the trick).

The way this automation works is that one of three events can trigger it, the time hits 9pm, it’s manually invoked, or my phone goes on the wireless charger (which we only have one of and it’s on our bedhead). When triggered, we read the state of the lock, which returns locked or unlocked and using a switch node we check for unlocked and if it is, it’ll call the service in HA to lock the lock and send a notification to my phone to tell me I forgot to lock the front door.
Advanced Automations
That automation is pretty simple, but let’s try something a bit more advanced. I was talking to my friend Tatham, who also has the Yale Assure lock, and he was telling me about some of the stuff he did with his, like issuing PINs and setting time windows. This made me think of an innovative way to handle our cleaners access. Our cleaner comes once a fortnight so we issued them a PIN to access the house, but I really don’t need that PIN to be active outside of the day they come, so, let’s set it up as a time-based PIN.
I started off by creating a boolean helper called cleaner_day, which we use to visually indicate that the cleaner is coming on our HA dashboard. I then adapted a pattern that Tatham had and defined three more helpers, a text helper for the PIN, a text helper for the user ID on the lock and a select helper to indicate the status of the PIN:
| |
I created two automations that will enable/disable cleaner day:
| |
Both automations run on Wednesday (the day they come) but the “enable” only runs on every second one. I could probably improve the enabling Cleaner Day using some of the new features around events, but this works.
Now that HA knows that it’s the day the cleaner is coming, we can have another automation run to enable their PIN.
| |
Now the first thing you might wonder is why this is a separate automation and not bundled into the other ones. Well the primary reason is so that if we had an additional day that we book the cleaner for, we can manually change the cleaner_day helper and this automation will run.
This automation is somewhat complex, so let’s break it down. First, we’re going to use some variables for the important data, rather than constantly using the entity IDs:
| |
We’ll then report that we’re provisioning PIN access for the cleaner:
| |
This is mostly for some debugging workflows, but I do find it somewhat useful to know this. Now we’re going to have to instruct the lock that we’re changing a PIN. Since I’m using ZigBee2MQTT we can fire MQTT messages to the lock, and one of those is updating the PIN by providing a JSON payload:
| |
We grab the variables defined earlier and add that to some hardcoded stuff. The user_type is set to unrestricted, as this field is used to create schedules on the lock itself, but we manage that in HA so unrestricted is fine as it basically says “this user is known and allowed, let them in”. For the pin_code field, we either set it to their PIN, or set it to “null” (via None) if they are having access disabled. You could do this slightly differently by setting the user_type to non_access and not messing with the PIN, as that means they are recognised but don’t have access, but I find this works just as well.
Lastly, we wait for a minute to get a MQTT response, and update the provisioning state with the outcome, or set it to Failed if it times out.
Here is it in action on the dashboard:
I have a similar automation that will run when the PIN of any user in our system changes, such as the House Sitter PIN, which is randomly generated when we enable House Sitter access so each time we have a new PIN that only exists for the duration of their stay, and set the input_text.house_sitter_pin which then triggers an automation to activate/deactivate any PIN:
| |
This automation is largely the same as the cleaner one, but the trigger is different and it means that if anyone wants their PIN changed, all we have to do is update the appropriate helper and it should just work (this wouldn’t work for the cleaner as you’d either have to let them know of a new PIN each visit, or store their old PIN somewhere set it back to).
Conclusion
There are a few other automations I’ve got around lock/unlock based on various conditions, but these are the most interesting ones I have and they have been working solidly for nearly six months.
I always thought that I’d find a “smart” door lock useful, but this is one of those things that it’s just amazing how quickly we adapted to it. These days we don’t carry keys with us, unless it’s the car key, and then we only take the keyless entry FOB with us, we even traveled internationally and didn’t take a key, we just don’t need to, the PIN pad is so convenient. Even our kids have adapted to it, they quickly learnt my wifes PIN and now will race us home from school and fight over who gets to unlock the door.
It’s also been super convenient with house sitters, we haven’t had to work out the logistics to leave keys somewhere and then pick them up again, just issue a PIN and send through instructions on how to use it.
So far the only problem I’ve had is early on there would be times when the lock wouldn’t respond to requests or it wouldn’t report state correctly, meaning that it would tell us it’s unlocked at night but wouldn’t lock. While I wasn’t able to get a definitive answer (it’s not like I could pull the logs from the lock), the problem seemed to be that the lock bolt was rubbing on the striker plate and this was causing the lock to go into a fault mode and stop responding on ZigBee. Some adjustments to the striker plate and this seems to have resolved itself and we haven’t had problems for probably four months now.
I still really like the initial options I looked at, such as the August and Danalock, but for day-to-day use, not having to get out a phone to unlock, and also not having to install a separate PIN pad, has made me realise that the Yale is really a great choice for the primary entranceway (I may get the others for the other deadbolts in the house, but that’s a low priority).
Ultimately, the Yale has been great and I would 100% recommend it to others. It was simple to install (well… get installed in my case!), it is easy to use (our 4 year old can do it) and it integrates nicely with Home Assistant on ZigBee (and I’d assume Z-Wave, I just haven’t tried it. Yale US have also said they are working on a Matter network module too) so you can automate it with no problems.