It’s just over 12 months since we moved into our house and I started properly running Home Assistant and designing our smart home. In that time I’ve been lucky that nothing has really “gone wrong”, sure there have been the odd bug here and there (see my last post on debugging tips), but the system hasn’t “died”. But before we moved into this house I was experimenting with Home Assistant and wasn’t so lucky - the SD card running it died and I lost everything. I don’t want that to happen again, so I’m going to do something I’ve been putting off for a while - setup a NAS and backups.
NAS
A NAS, or Network Attached Storage, is a remote storage device that you can access over your network. It’s basically a hard drive that you can access from any device on your network. I’m going to use it to store backups of my Home Assistant instance, but also to store other files like photos and videos.
Many people I know have a Synology NAS, and while I’m sure they are great I don’t really need much from my NAS, either in features or storage, after all, anything that is important that I’m storing is in OneDrive already, so I don’t see why I need something local with large amounts of storage. Also, neither my wife or I are really into photography, so we don’t have huge images to store, and we don’t have a huge movie collection either, that’s what streaming services are for.
So I decided to repurpose an old 1TB external HDD that has been sitting in a cupboard for a few years and turn it into a poor excuse for a NAS… but given it’s just a USB drive I’ll need something to connect it to that is always powered on, and for that I’ll use the Raspberry Pi that is running Pi Hole.
Why am I not using the one running Home Assistant? Well firstly, that wouldn’t be a NAS would it, but more importantly, I’m running HAOS and I don’t want to mess around at the OS level and risk blocking upgrades. Besides, the PiHole doesn’t do a whole lot, so it can pick up the slack.
Setting up the NAS
I’m going to use Samba to share the drive over the network, since it’s the easiest way to expose it for integration into Home Assistant (and to the Windows and Mac devices on our network).
First step was the mount the USB drive in the Pi, and to do that I needed to know where the disk was to mount, which you can find with lsblk:
aaron@raspberrypi:/media $ lsblk
NAME   MAJ:MIN RM   SIZE RO TYPE MOUNTPOINT
sda      8:0    1  28.7G  0 disk
├─sda1   8:1    1   256M  0 part /boot
└─sda2   8:2    1  28.4G  0 part /
sdb      8:16   0 931.5G  0 disk
└─sdb1   8:17   0 931.5G  0 part
We can see that the drive is /dev/sdb1, so it can be mounted with:
| |
Next we’re going to need to ensure Samba is installed on the Pi:
| |
And then configure it by editing /etc/samba/smb.conf:
[external-1]
comment = 1TB External Disk
path = /media/usb
browsable = yes
guest ok = no
read only = no
create mask = 0755
directory mask = 0755
write list = aaron
I’ve locked down the share to require authentication, and only allow my user to write to it, so then we need to create a user for Samba:
| |
And finally restart the Samba service:
| |
With that, our Samba server is up and running and we have a poor excuse for a NAS!
Handling file system permissions
This was something I didn’t take into consideration, and may not be a problem for you, but since the drive was formatted on a Windows machine it was a FAT32 file system, and this posed a problem when trying to write to it via Samba - it was owned by root on the Pi, since they mounted it, and because FAT32 doesn’t support file system permissions, I couldn’t change the ownership of the files on the drive.
To solve this it was a matter of formatting the drive to ext4:
| |
Now the drive was mounted with the correct permissions, and I could write to it via Samba.
Integrating with Home Assistant
In the Home Assistant 2023.6 release they added better support for network storage, meaning you can connect to a NAS via Samba or NFS natively, rather than an add-on as previously required.
The other advantage of this is that when you attach the storage to Home Assistant you can select the type of storage that will be used for, with one such option being backups, and that will natively integrate with Home Assistant’s backup system.
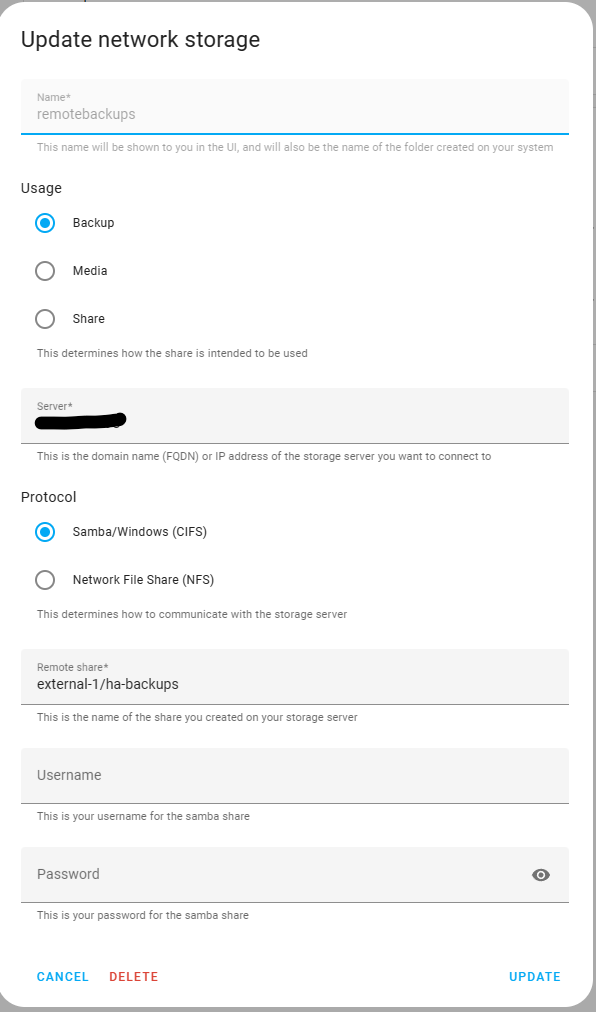
Since I might want to use the storage for other stuff in the future, I’ve made a folder on the drive called ha-backups and specified that subpath in the storage connection.
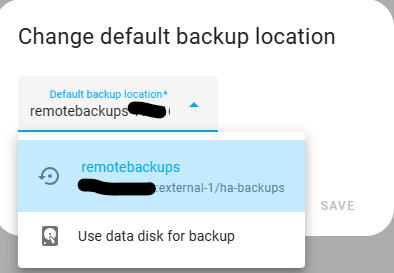
From the Backups section of Home Assistant you can change the default location for backups to be the new network storage:
Offsite backups
Having a NAS is great, but if it’s in the same physical location as your Home Assistant instance, and that location burns down, you’re still going to lose everything. Now while I’m not planning for that to happen, I’ve been in tech long enough to plan for the worst case scenario, so I’m going to setup offsite backups.
If you’re using a Synology or other proper NAS solution, you probably have some integrated way to ship those backups to a remote location, but we’re not that fancy, we’ve created a poor excuse for a NAS, so we’re going to need to do this ourselves.
Thankfully there’s Home Assitant add-ons that can help us, Google Drive Backup or a OneDrive version. I’m going to use the Google Drive version, since I already have a Google account that is dedicated to smart home stuff (and isolated from my personal Google account) and while my primary storage location for stuff is OneDrive, I want to keep things separated.
The add-on is pretty simple to setup and the instructions are pretty clear, so I won’t go into detail here, but once it’s setup you can configure it to run on a schedule, and it will automatically upload your backups to Google Drive. For me, I’m going to run it every night at 11.30pm and keep 20 days worth of backups, as my full backup size is about 550mb and there’s 15GB of storage available on the Google account, so a rolling 20 days gives me plenty of runway to restore from a backup if I need to.
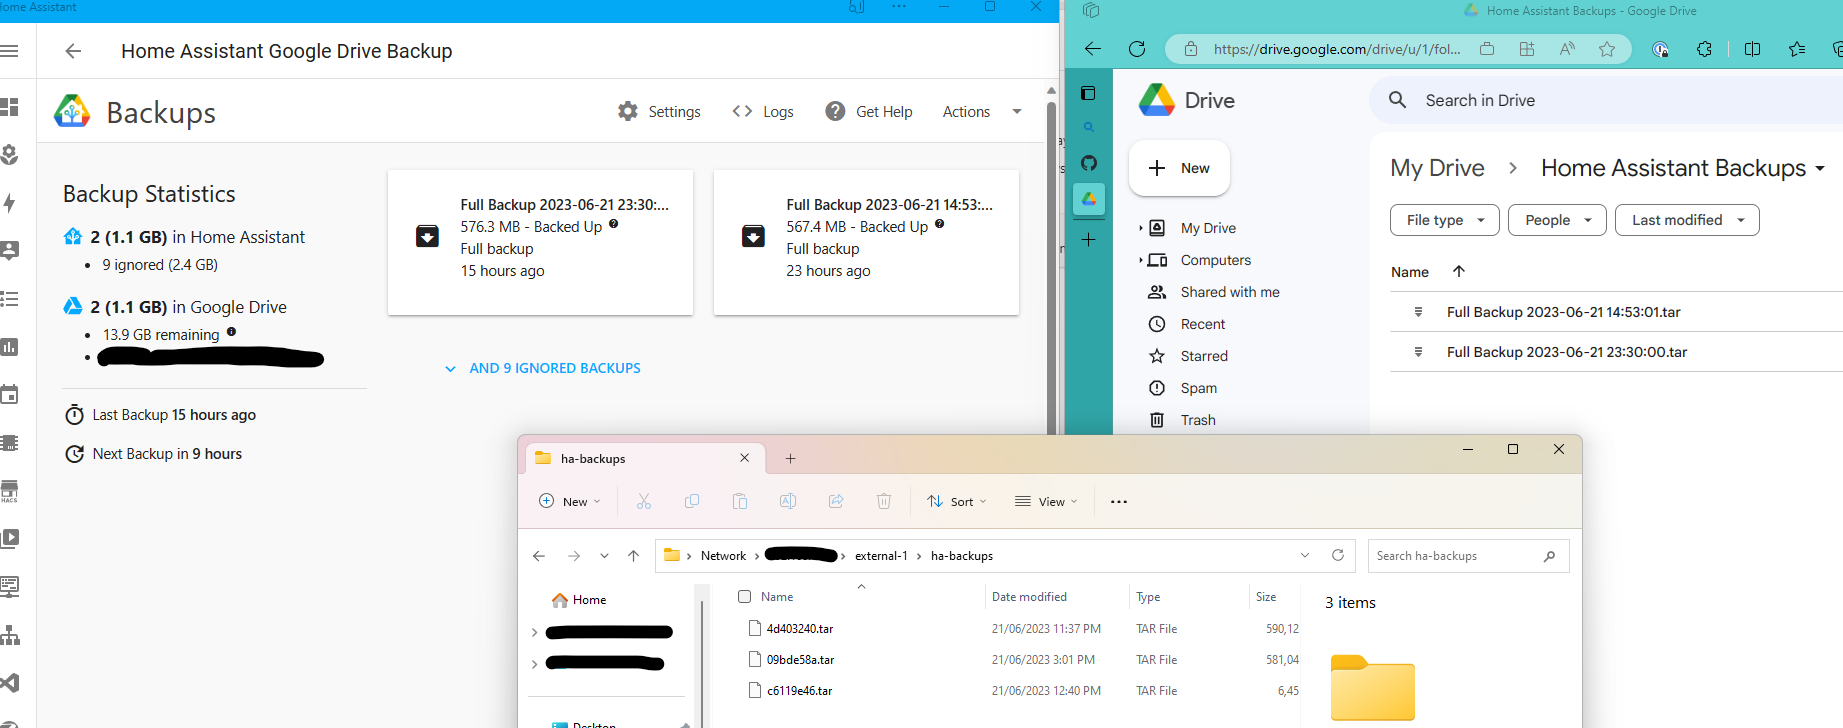
Note: It lists 9 backups that are ignored, those backups are stored locally on the Pi that Home Assistant runs on, they aren’t uploaded to Google Drive.
Conclusion
This is something that I’ve been putting off for a while now. I’d played with the previous add-ons for working with Samba but always struggled with them, so I’m glad that Home Assistant has added native support for network storage, and that it’s so easy to configure, and that combining it with the Google Drive Backup add-on was easy and now I have a proper backup strategy in place… although I should probably test it at some point to make sure it actually restores… 😅
All in all, I probably spent about 30 minutes getting this all setup, but it took me a few days because I kept forgetting that it’s umount not unmount to unmount a disk in Linux, and then fighting with file system permissions, before realising I should just use ext4.
Shout out to Everything Smart Home for a great guide on getting everything setup and to Lars for another look at how to do it leveraging NodeRED.